This guide will walk you through how to setup a study in MUiQ.
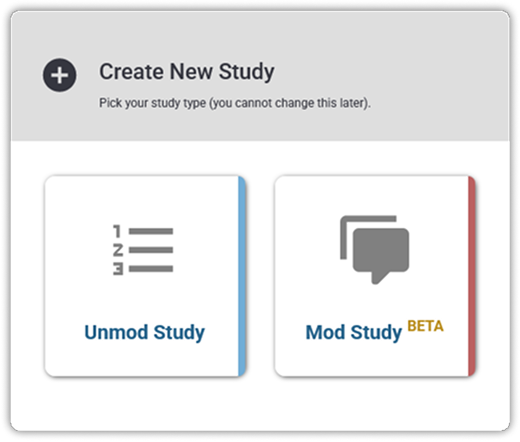
Create a new study.

Select Unmod Study
Select “Blank Study” to open a blank study editor.

Alternatively, select any other predefined study to automatically configure the items below.
Enter your internal study name. Participants will not see this.


❗IMPORTANT: Make sure Tasks & Conditions are both enabled, if you are comparing usability tasks across different conditions.
For standalone studies (i.e. with a single condition), you can skip enabling Conditions and ignore the Pre-/Post-Condition sections.
For basic surveys without usability tasks, both Tasks and Conditions should be disabled, and all questions will be entered on a single “Questions” tab.

Confirm your allowed testing platforms.
Participants on disabled platforms will not be able to access the study.

For task-based studies you must “Require Install” of the extension in order to record all participants’ clicks and/or screens.
❗IMPORTANT: If participants do not install the extension, any URL-based tasks will open on two separate browser windows, resulting in a less seamless experience.

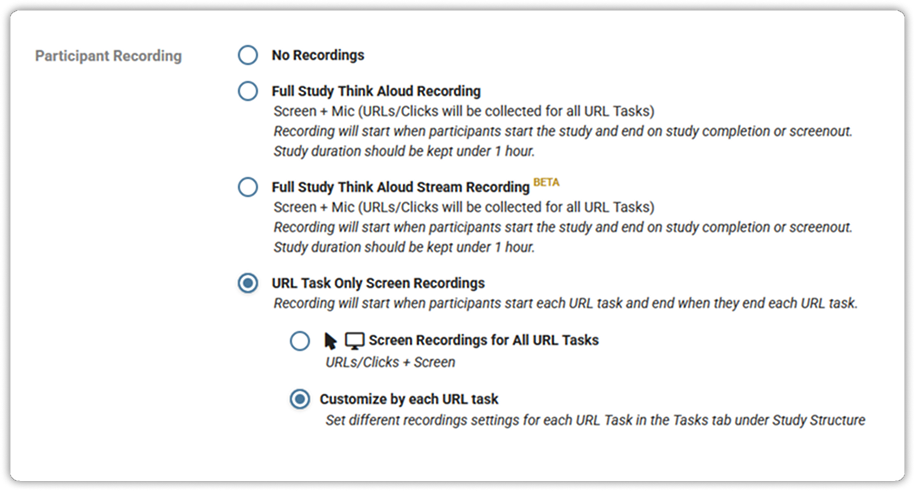
Confirm whether this study should contain screen recordings.
You can select Full Study Think Aloud recording for both task-based and regular surveys. For studies with URL tasks you can select to only record during each of the tasks and/or further customize the settings for each task as shown in a future step.

Set the Study Completion Quota, if applicable.


Depending on whether you have Tasks and/or Conditions enabled, you will only see the section tabs across the top menu that apply to your study configuration.
Under Messages, you can customize the initial study welcome message, as well as other study messages.
If URL redirects are enabled, participants will not see the respective study completion/termination messages.
Under Pre-Study, enter any demographic questions (e.g. age, gender, income, education).
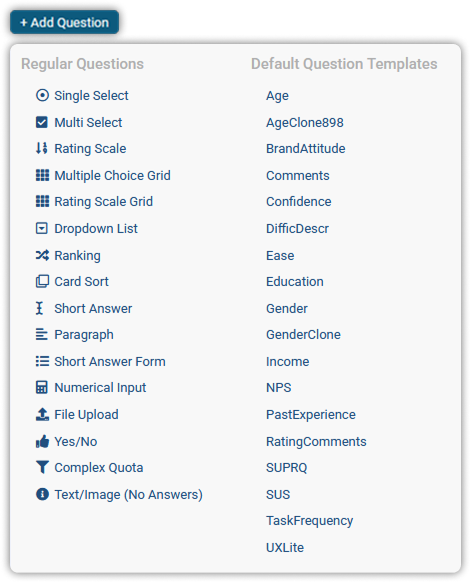
Pick a question type or add an existing template.
❗IMPORTANT: Make sure to select “Rating Scale” if your question is based on a numeric scale.
Enter an internal name for the question. Participants will not see this, but this will keep track for analysis.

In the text field, enter the question text prompt participants will see.

Then, add all possible answer options or categories as needed.

Select this if you want to terminate any participants based on a specific response.

Select this to randomize the order of answer options for each participant.
This will allow participants to manually type in any “Other” answer.

Under Conditions, specify the competitor/prototype versions to be compared.
Add one condition for each competitor/prototype version.

Enter a name for each condition (e.g. “Marriott” or “Best Western”).
Participants won’t see this, unless you use the {cond} tag in later questions which allows you to pipe in these condition names.

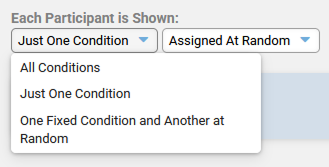
Confirm your study design and any condition randomization.
Each Participant is Shown: “Just One Condition” indicates a Between-Subjects study.
Each Participant is Shown: “All Conditions” indicates a Within-Subjects study.
Under Pre-Condition, enter any questions to be compared across conditions that will be asked prior to all tasks.
Add any questions as you did for Pre-Study. (Examples include Prior Brand Attitudes, Retrospective Likelihood to Recommend, Past Usage).
Under Tasks, enter your tasks – this is the heart of your usability study.
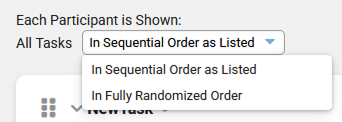
At the top of the page, you can randomize the presentation order of tasks for each participant.

Enter a name for each task (e.g. “Search” or “Browse”). Participants will not see this.

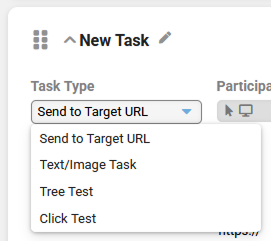
By default, every task will be URL-based:
Participants will be redirected to a specific URL when they start the task.
If you are testing prototype(s), simply specify the URL for the prototype(s).
Alternatively, you can also set up a task as text/image-based or a tree test.
(Note that Card Sorts are found under question types)
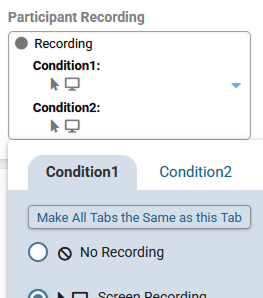
Confirm the “Participant Recording” settings for URL-based tasks, if you previously selected the setting to customize recording by each URL task under Information/Settings.
If you are recording Microphone and/or Webcam, participants will have to “Allow” in their browser permissions when they start the task.
❗IMPORTANT: Due to variability in website creation, Heat Maps and Click Maps may not render correctly for some prototypes and websites. Please to review your results as they come in. We also recommend setting up a pilot test study to confirm compatibility.
For screen recordings, you have the option to select “Low-resolution” or “High-resolution Video”. Unless you require microphone and/or webcam, we recommend using “Low-resolution” for a better performance and task experience.

Select this to customize the task texts (and validation criteria) for each condition.

The different task versions will then be split up into separate tabs for each condition.
For URL-based tasks, enter the respective starting URLs for each condition (include ‘http(s)://’)

Then, enter the task instructions for each respective condition.
❗IMPORTANT: Since this is an unmoderated study, be sure to clearly explain what participants must complete before they can select “End Task”.

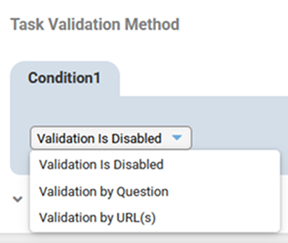
To measure Task Success, be sure to enable Validation.
For “Validation by Question”, a multiple-choice validation question will appear directly after the task.
(Example: “What was the name of the hotel that you found?”)
❗IMPORTANT: Be sure that the task instructions make participants note down any required information for the validation question.
For “Validation by URL”, enter all the acceptable URLs that count as task success when accessed.
For Validation by Question, mark all correct answer(s) to indicate Task Success.
You can also adjust these correct answers (or success URLs) later once the results have been generated.

Under Post-Task, enter the questions that will be shown after each of the tasks (e.g. Ease, Confidence).
If needed, you can customize post-task questions by Task or Condition (or both).

If so, you can also remove the question from any specific Task or Condition.

Under Post-Condition, enter any questions to be compared across conditions that will be asked after the final task.
Examples include NPS, SUPR-Q, Post-Study Brand Attitudes.
❗IMPORTANT: For a comparison study, you will want all your post-study metrics to be under the Post-Condition section.
If participants are assigned to more than one condition (Within-Subjects) they will see this section after every condition.
For a standalone study (i.e. single condition), you will want to move all your Post-Condition questions under Post-Study below.
Under Post-Study, enter any general final questions that will not be compared across conditions, if any.
Examples include General Study Comments, Participant ID.
To preview your study as a participant, select “Generate Preview” in the top right corner.
When you select this option, your responses will not be saved. Whenever you make additional changes to the study, you will have to Re-generate Preview.
If you missed to fill in any crucial information, you will be prompted to “Continue Edits”.

Once the study is ready, click on “Activate Study”.

The study is now active, and you can take it as a participant.
You can later manually exclude any testing data in the Results’ Participant Grid.
❗IMPORTANT: If you save any additional edits to an active study, the study will be reset to draft, and any existing response data will be deleted.
To avoid this, you can also clone the study and save your changes as a separate new study.

After you close the editor, your study will appear at the top of the study list.
Here is where you can copy the study URL, adjust quotas, and add permissions for other Team Users to View or Edit.
In the lower right corner, you also have the option to clone or delete this study.
❗IMPORTANT: By default, you can only see the studies for which you are the Owner (i.e. the ones you created). Admin(s) can see all studies.
To make any study appear for non-Owners, the Owner or Admin(s) must give those Users permission to View or Edit by adding them in the window below.

You can also set up Participant Recruitment as described in our separate Participant Recruitment Guide.
Was this article helpful?
That’s Great!
Thank you for your feedback
Sorry! We couldn't be helpful
Thank you for your feedback
Feedback sent
We appreciate your effort and will try to fix the article